A Dad Trying to Teach His Only Child in a Pandemic
Author: den
More often than not, people wonder what I'm up to. I'm a people watcher, and love to tell a stranger's story, as I see it. If you see me reading or writing in a coffee shop, there's a good chance I'm making up a story about you at that moment. I'm a visual person who loves finding inspiration in my surroundings, and believe that sometimes the smallest detail can tell the majority of the story, if you have the sense to recognize it.
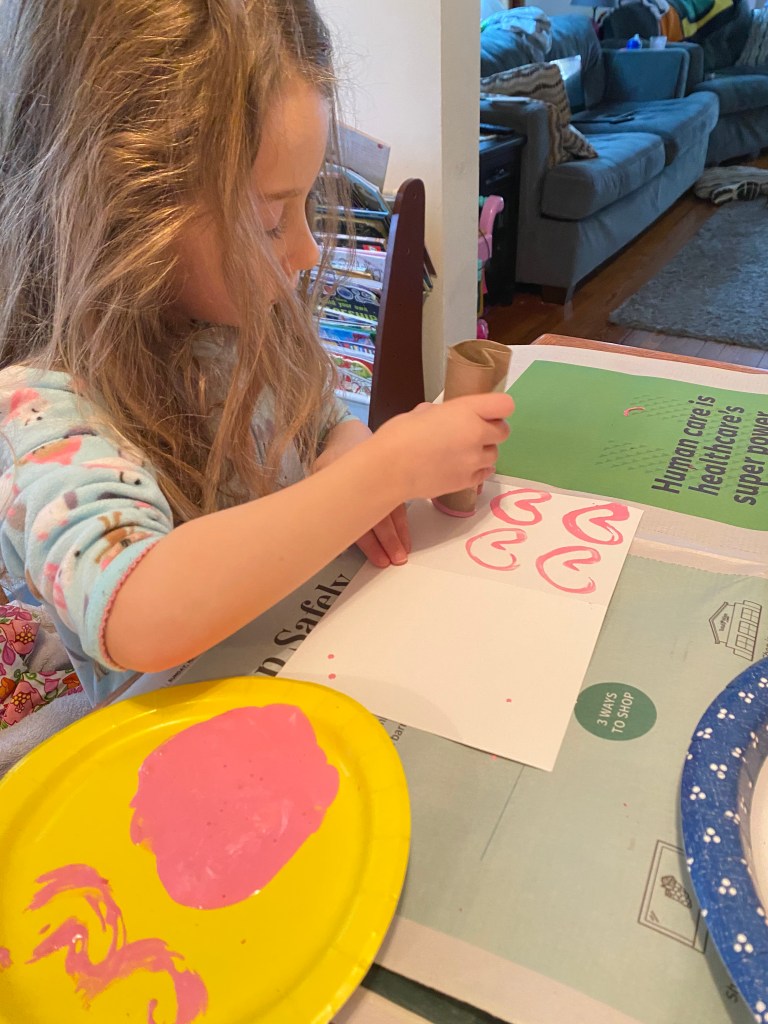
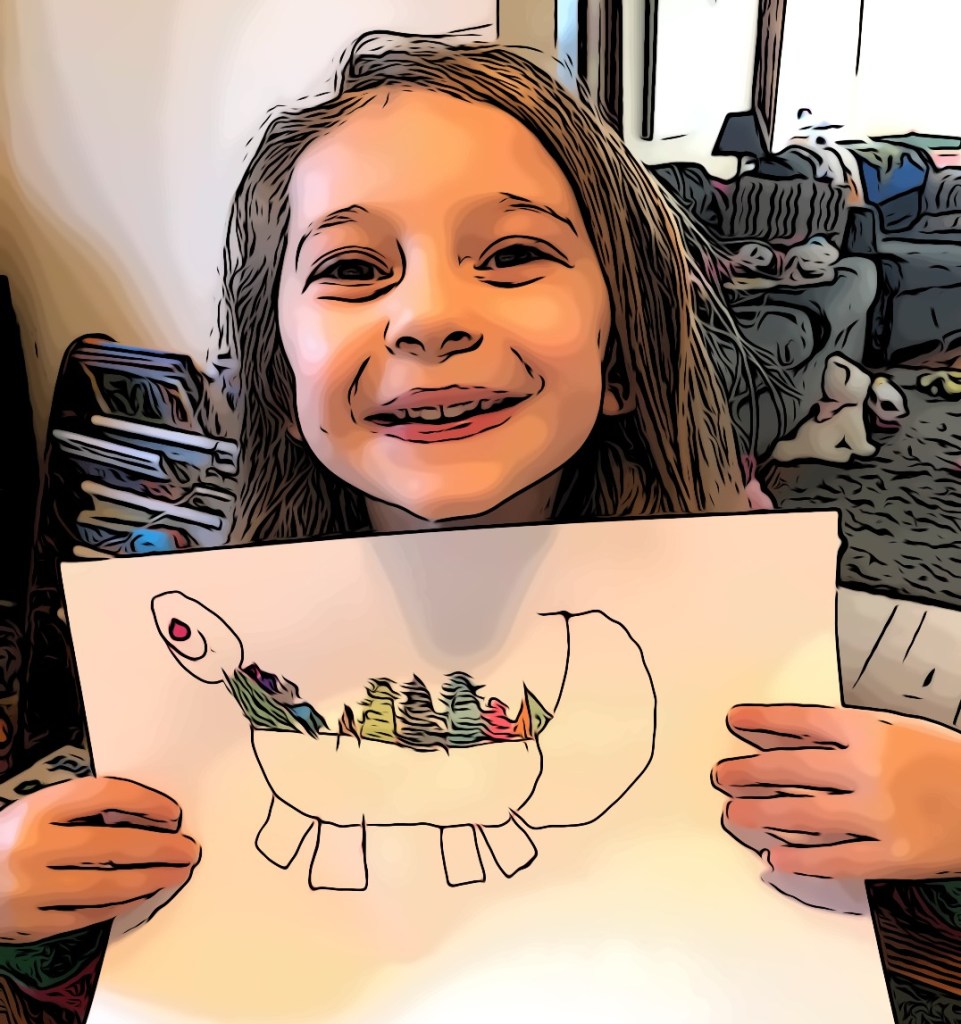
This time Amelia is the teacher and dad is the student in this valentine’s day craft.
Amelia took charge today! It was a blast. She wanted to show me how she made a Valentine’s Day craft in school this week. The good news is that this is a perfect craft for last minute Valentine creations since you probably have the supplies in your house:
Toilet paper/paper towel cardboard tube
Red or pink paint (or any color, really)
Paper
Tape
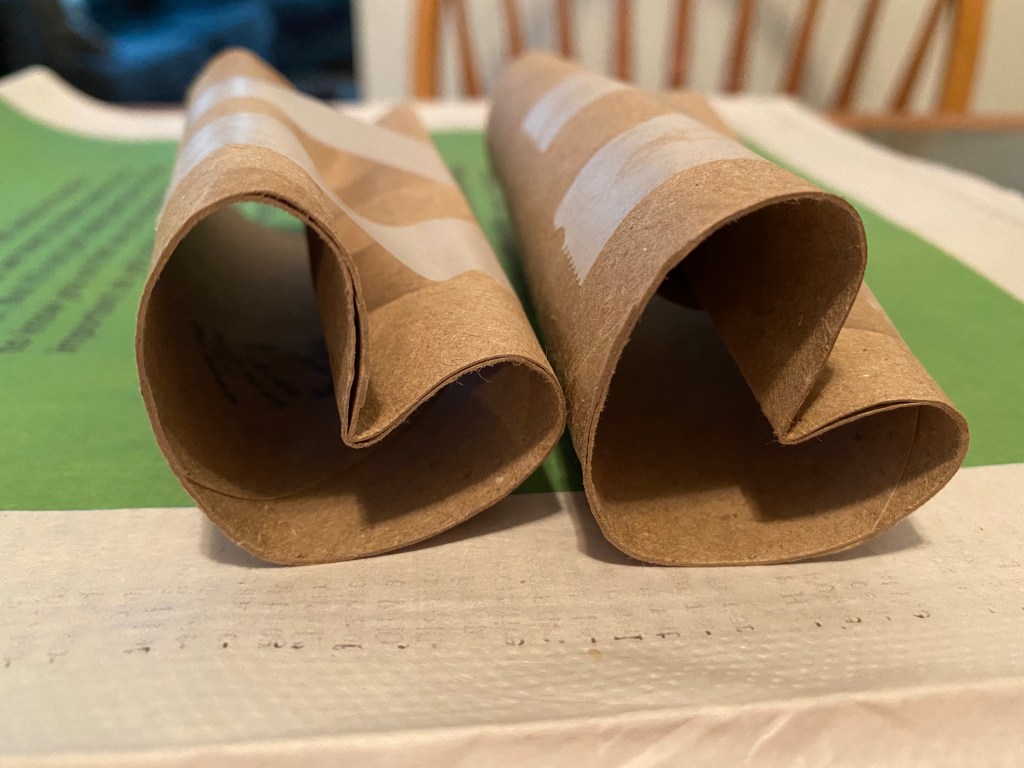
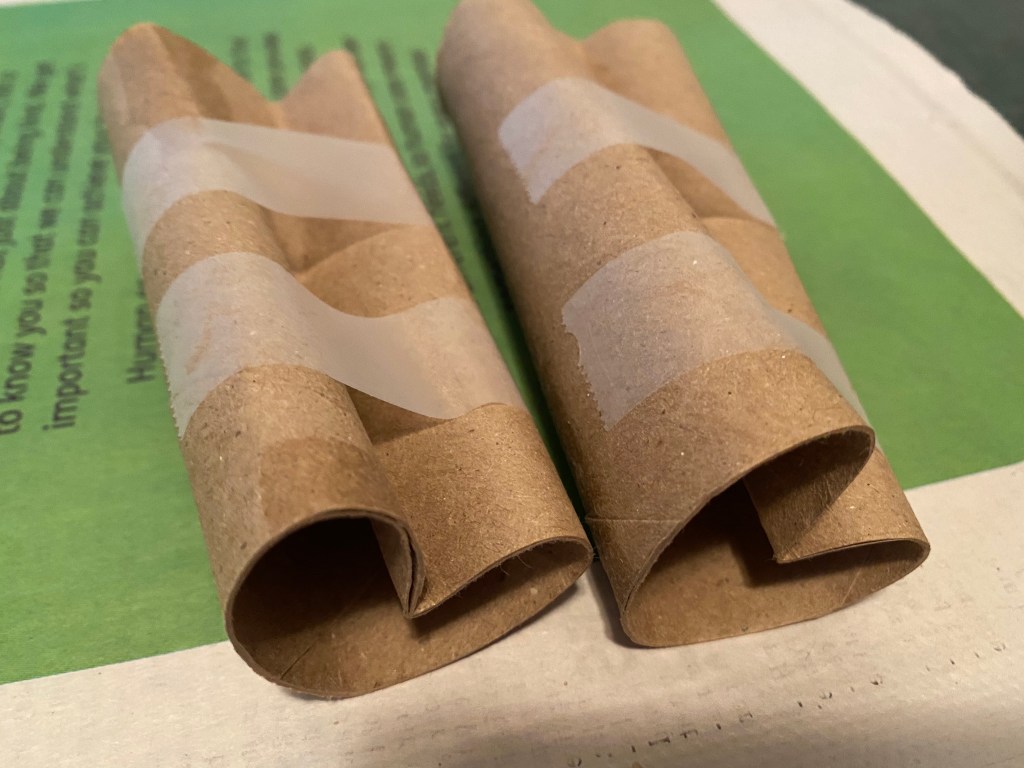
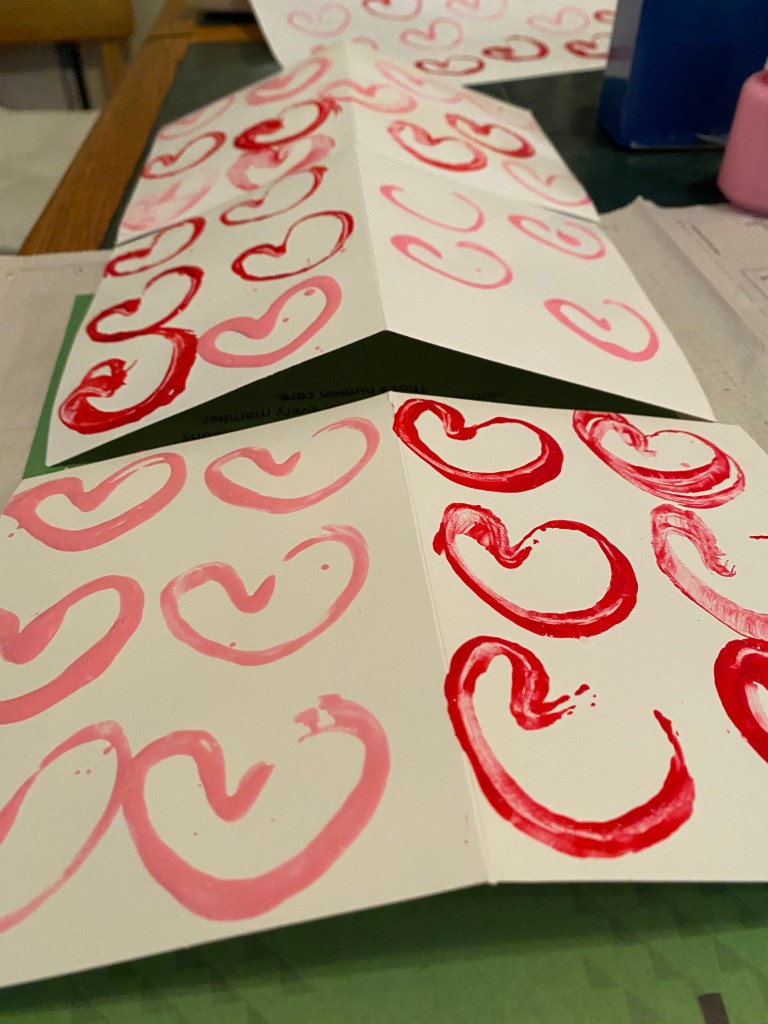
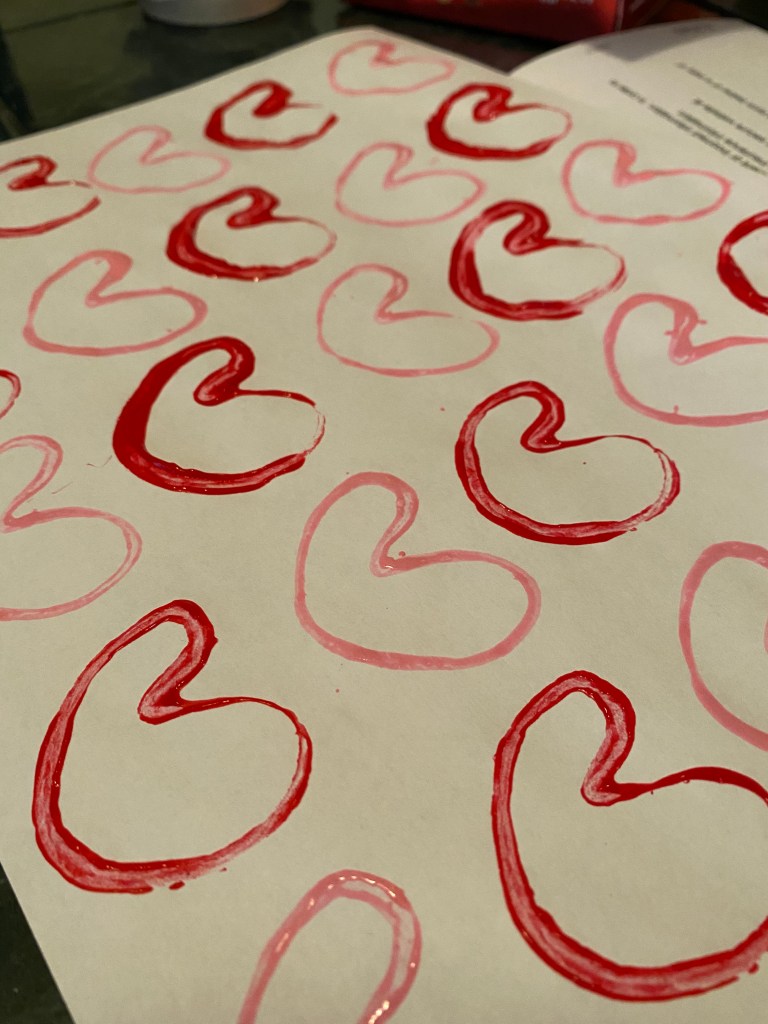
That’s it! So first, she showed me how to roll the tube so that it looked like a heart. Once that’s done, you tape it so it keeps that shape. I did have to add more tape as we tested the “stampers” so that the whole heart would show on the paper.
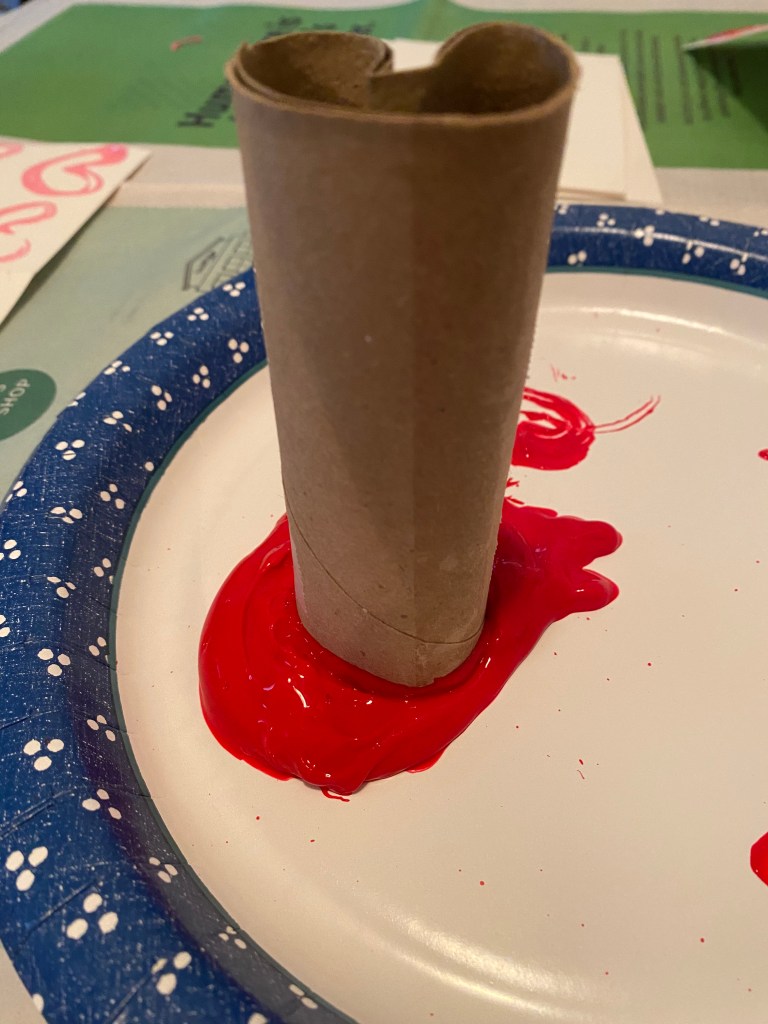
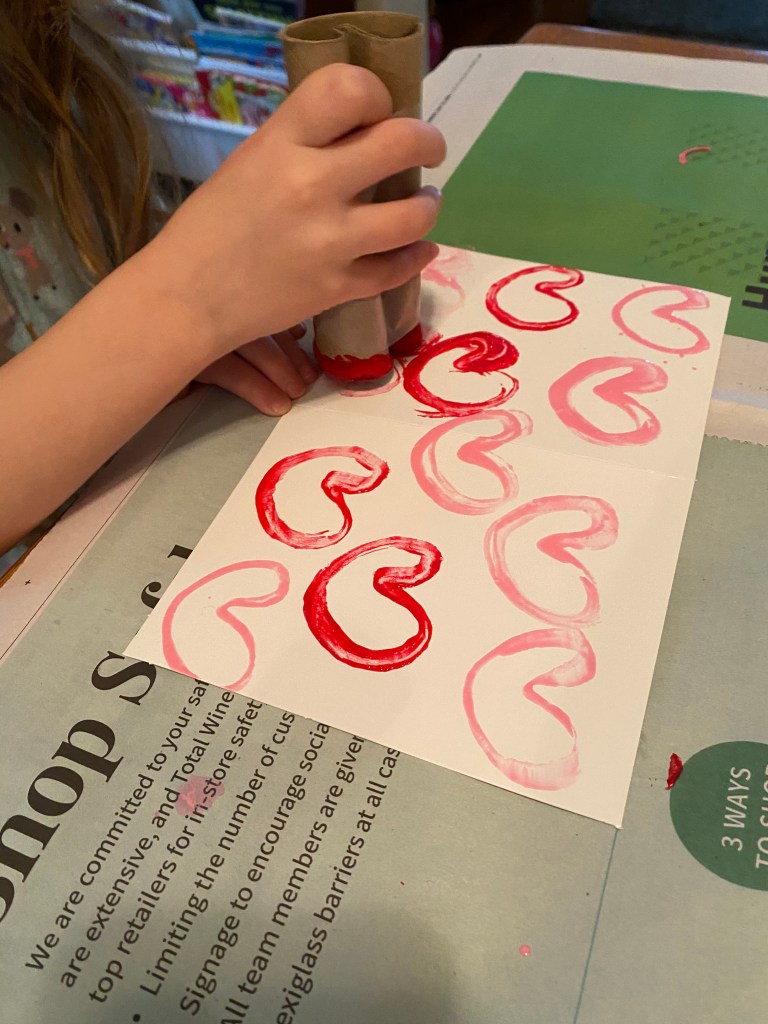
Then you dip it into the paint and use it as a stamper! This was a fun and easy project. We churned out a whole bunch of valentines for people, and had fun doing it.
As you can see from the final product below, these turned out pretty nice. Amelia was a great teacher, it was a fun Friday morning craft, and it was an easy way to get her to create some valentines for the family. Now I just have to get her to write in them!
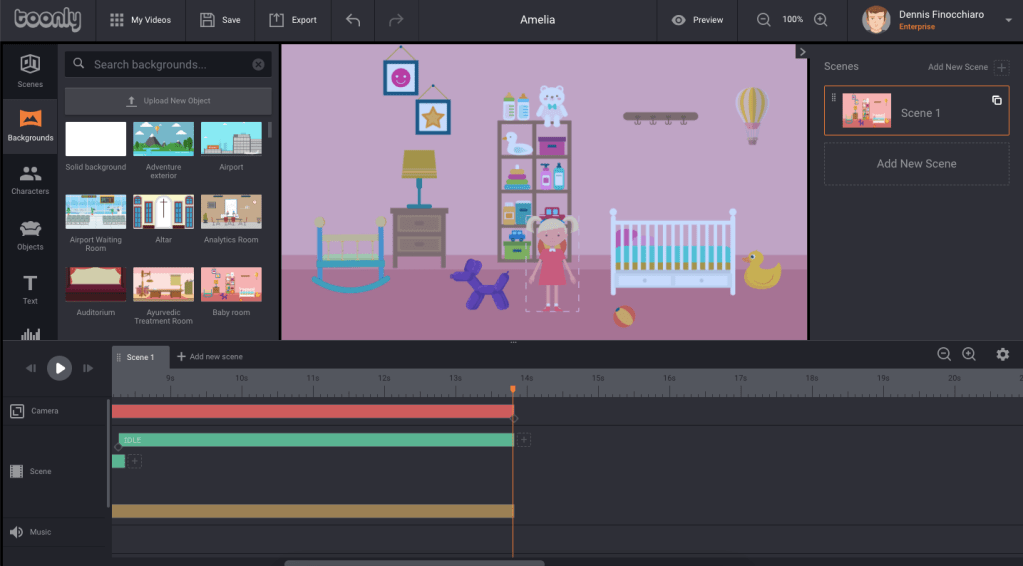
Amelia and her daddy make their first cartoon using Toonly.
Last week I downloaded the Toonly animation program to start learning how to work with it. For practice, I asked Amelia if she wanted to create a cartoon. She was into the idea.
So we made this little cartoon. She came up with the story and chose the backgrounds/characters, and we worked together tightening it up, writing the script and recording the voice overs.
It was a lot of fun, and Amelia learned a lot. She saw how much work goes into cartoons (not that this is even CLOSE to how much work goes into real ones) and also learned how many times it took her to get her lines right. She had to make choices on backgrounds, and you’ll see that at first she wanted it to be a baby’s room, but eventually made the decision to change it to a little girl’s room instead.
It was a lot of fun and she got to see a different form of the creative process: storytelling. She also learned a bit about plot, character and all of the essential parts that make up a story.
Here is the final product:
If you like it, please leave us some comments on YouTube. You can like and follow us as well, since we will probably keep making more videos. Amelia would love to hear what people think! We would also love it if you would share it. Thanks!
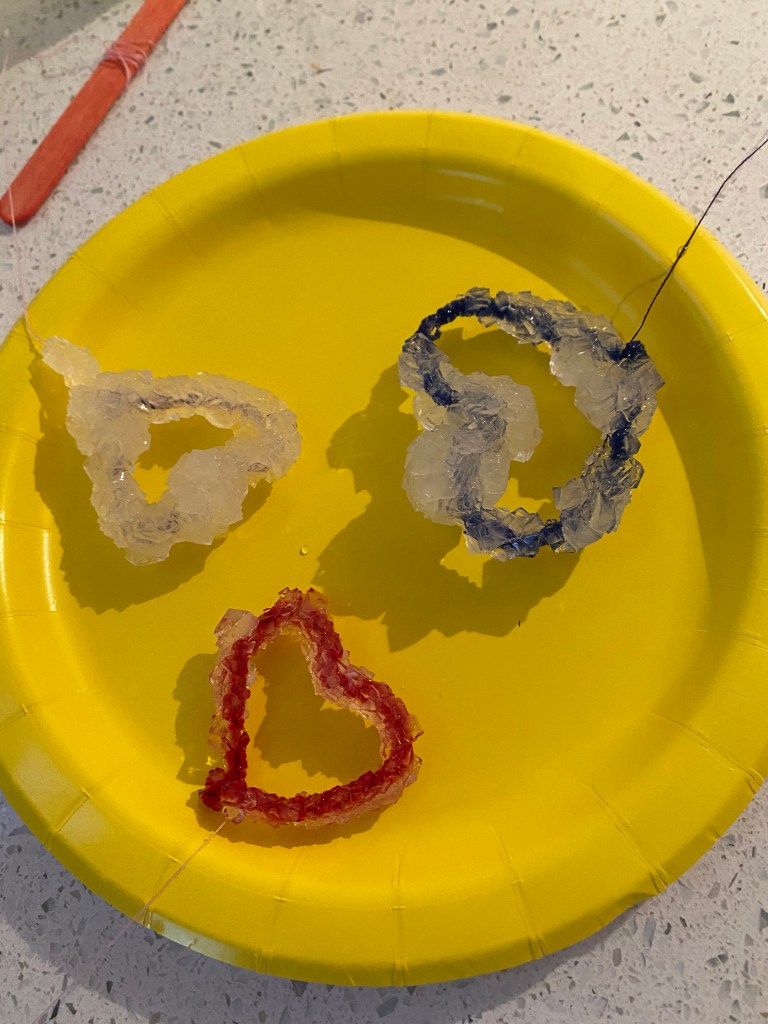
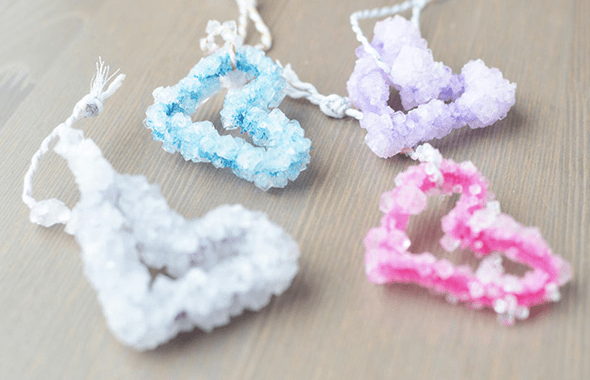
Amelia and her family try growing crystals shaped like hearts for Valentine’s Day.
As promised, after doing some research for our crystal project, which turned out AWESOME, I found a website that taught us how to create heart-shaped crystals using pipe cleaners and borax.
Supplies:
½ quart (2 cup) canning jar or high heat stable measuring cup (we had to use large jars and made extra solution)
1 ¾ cups of very hot water (almost boiling)
1/3 cup borax
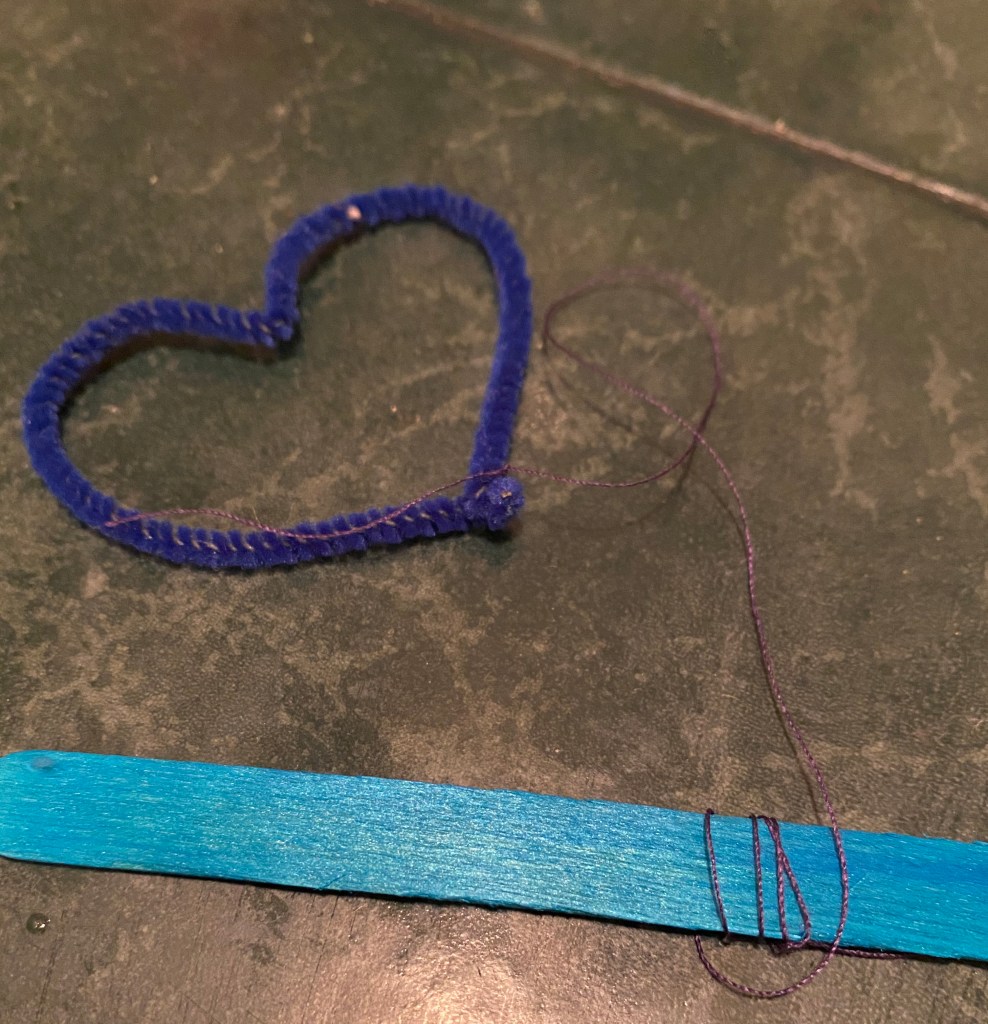
pipe cleaner/chenille stem, cut in half
string (we used thread)
tape or a pencil (we used a craft stick)
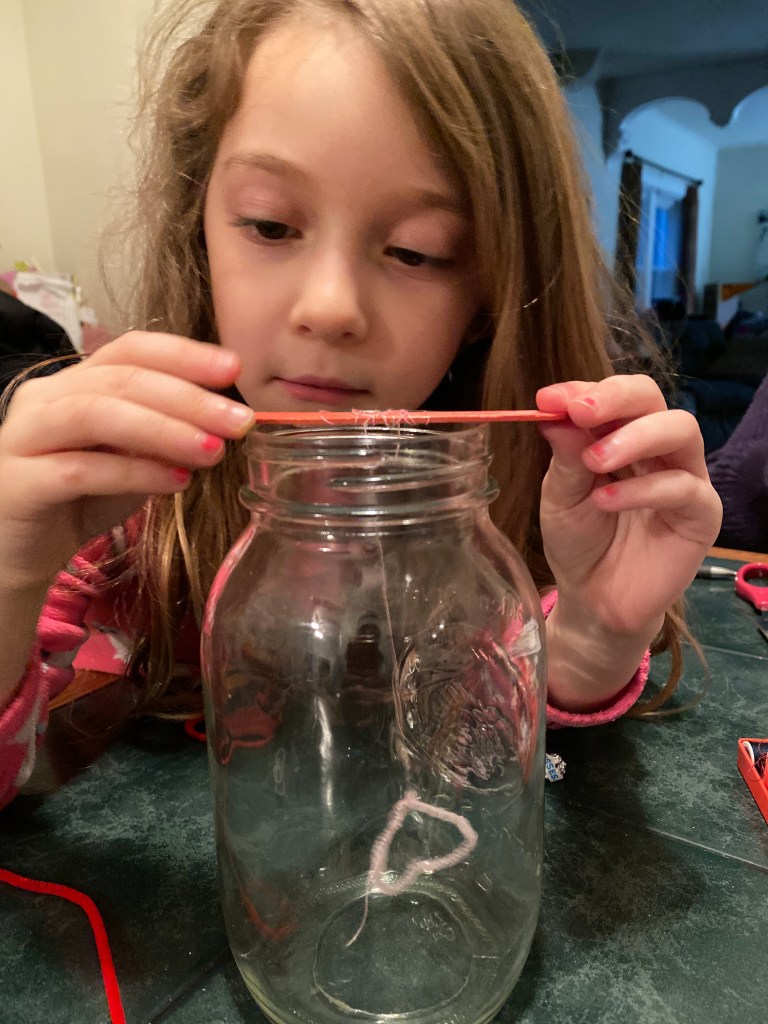
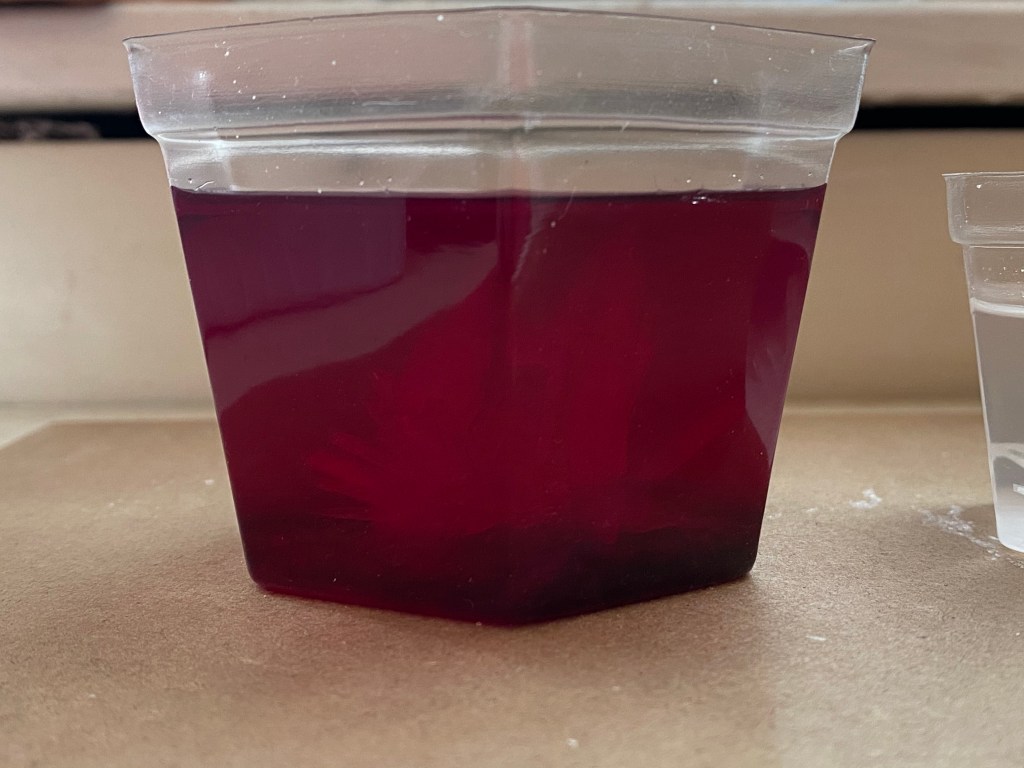
The whole family did this project, so Amelia chose a light pink pipe cleaner, mommy picked a red one and I picked blue.
First, we created the hearts and then trimmed the excess pipe cleaner. Then we tied thread to the bottom of the heart and tied the other end to the craft stick.
Then we hung them from the top of the jar. They have to be low enough to be completely under the liquid, but they can’t touch the sides of the jar or the crystal will attach to the jar.
We also allowed for extra thread that we could wrap around the stick to raise/lower the heart easily.
Then we added the liquid as directed. Basically, once the water started to form bubbles in the bottom of the pot I turned it off and poured it. Obviously for smaller kids this is a parent’s job. We poured the borax and mixed. We even added a little extra when we saw the whole 1/3 cup dissolved.
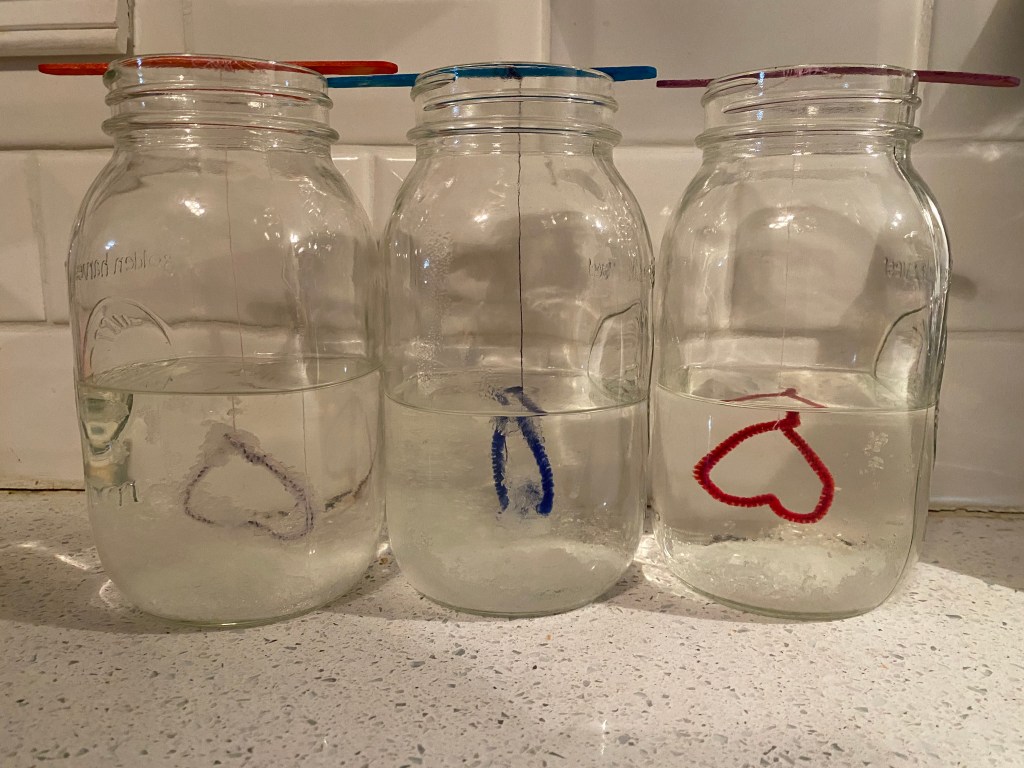
I then carefully poured the water in. We found our hearts floated at first, so we used an extra craft stick to push it under. Then we put them in a safe place where they wouldn’t be bumped into or jostled in any way, and waited. Here are the results:
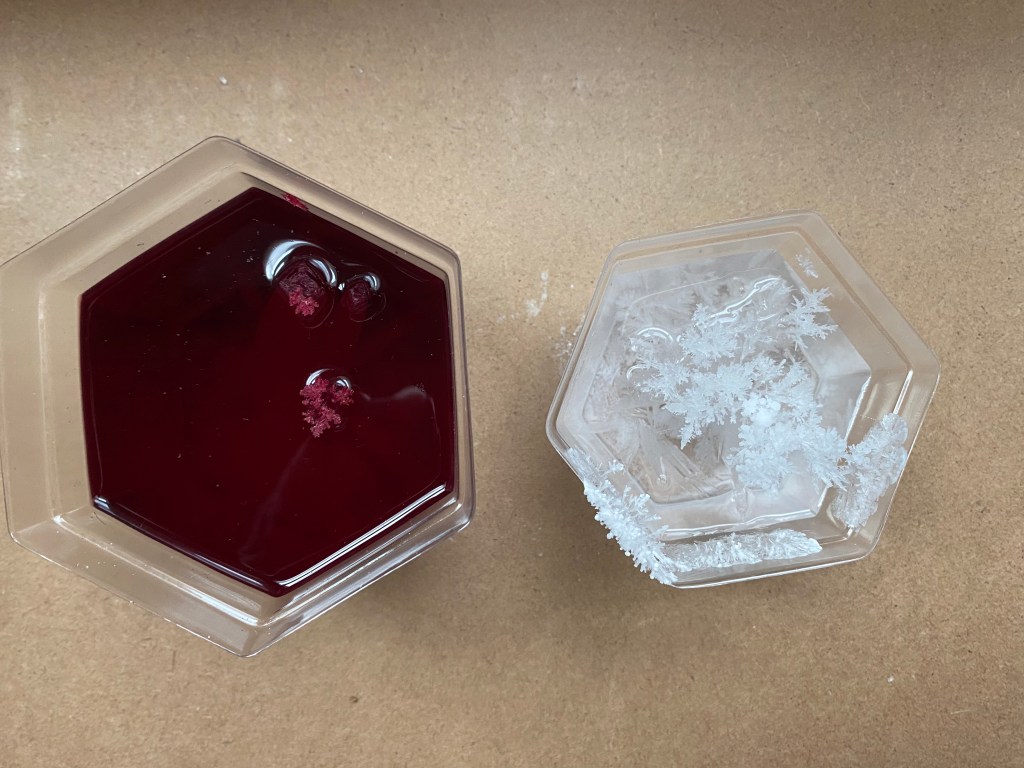
At first, it looked like mom’s red one wasn’t going to grow any crystals. The first image is after an hour. The second is three hours later, and the last image is from the next morning.
It’s important to take the hearts out of the water before they start to get too big, or attach to the sides of the jar.
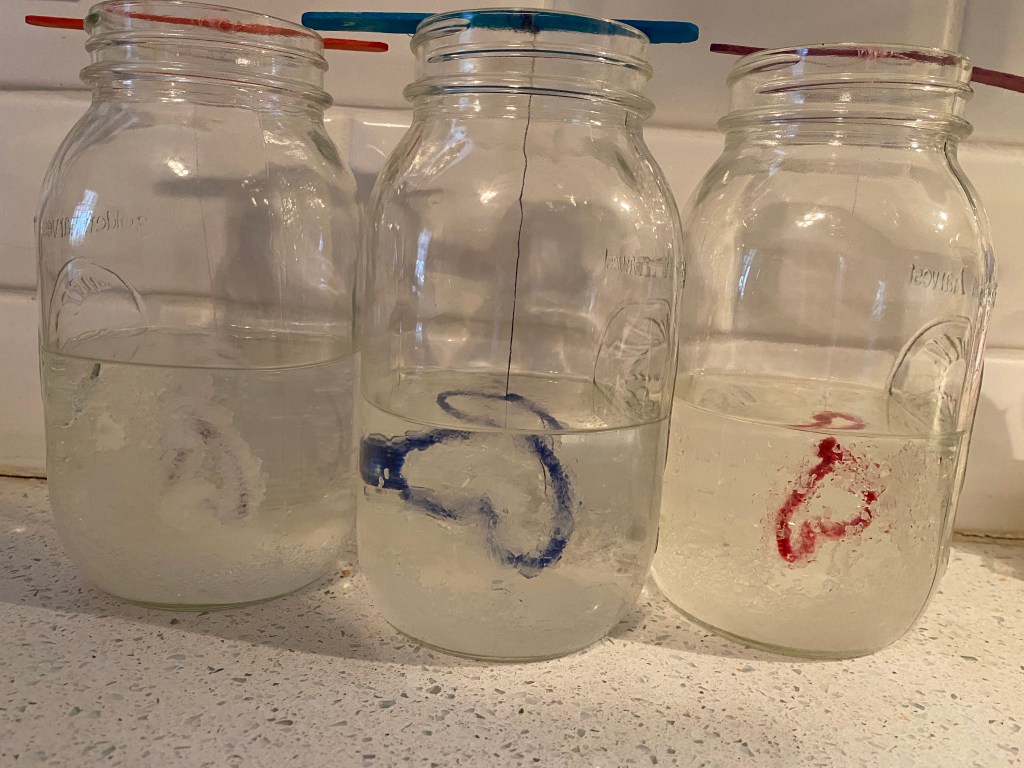
Side note: we thought we may have ruined the jars since crystals formed all over the bottom of them, but a quick ride through the dishwasher cleaned them right up!
Here are the final results:
Special thanks to Childhood 101 for this idea. Their heart crystals turned out even nicer than ours, so make sure you check it out.
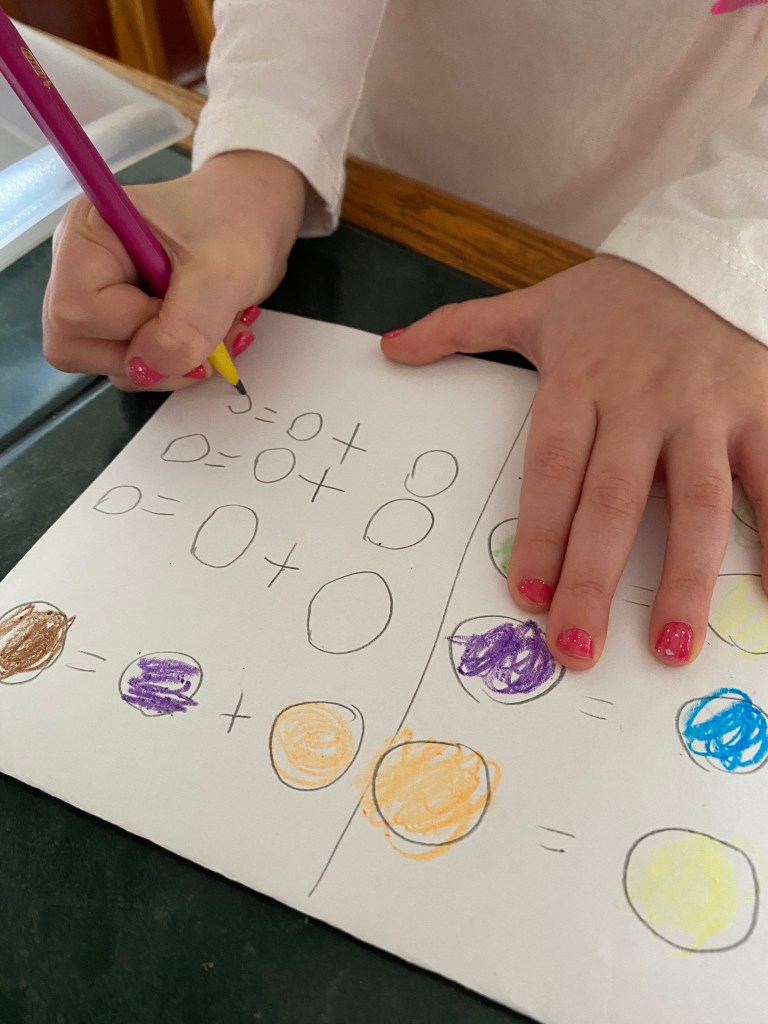
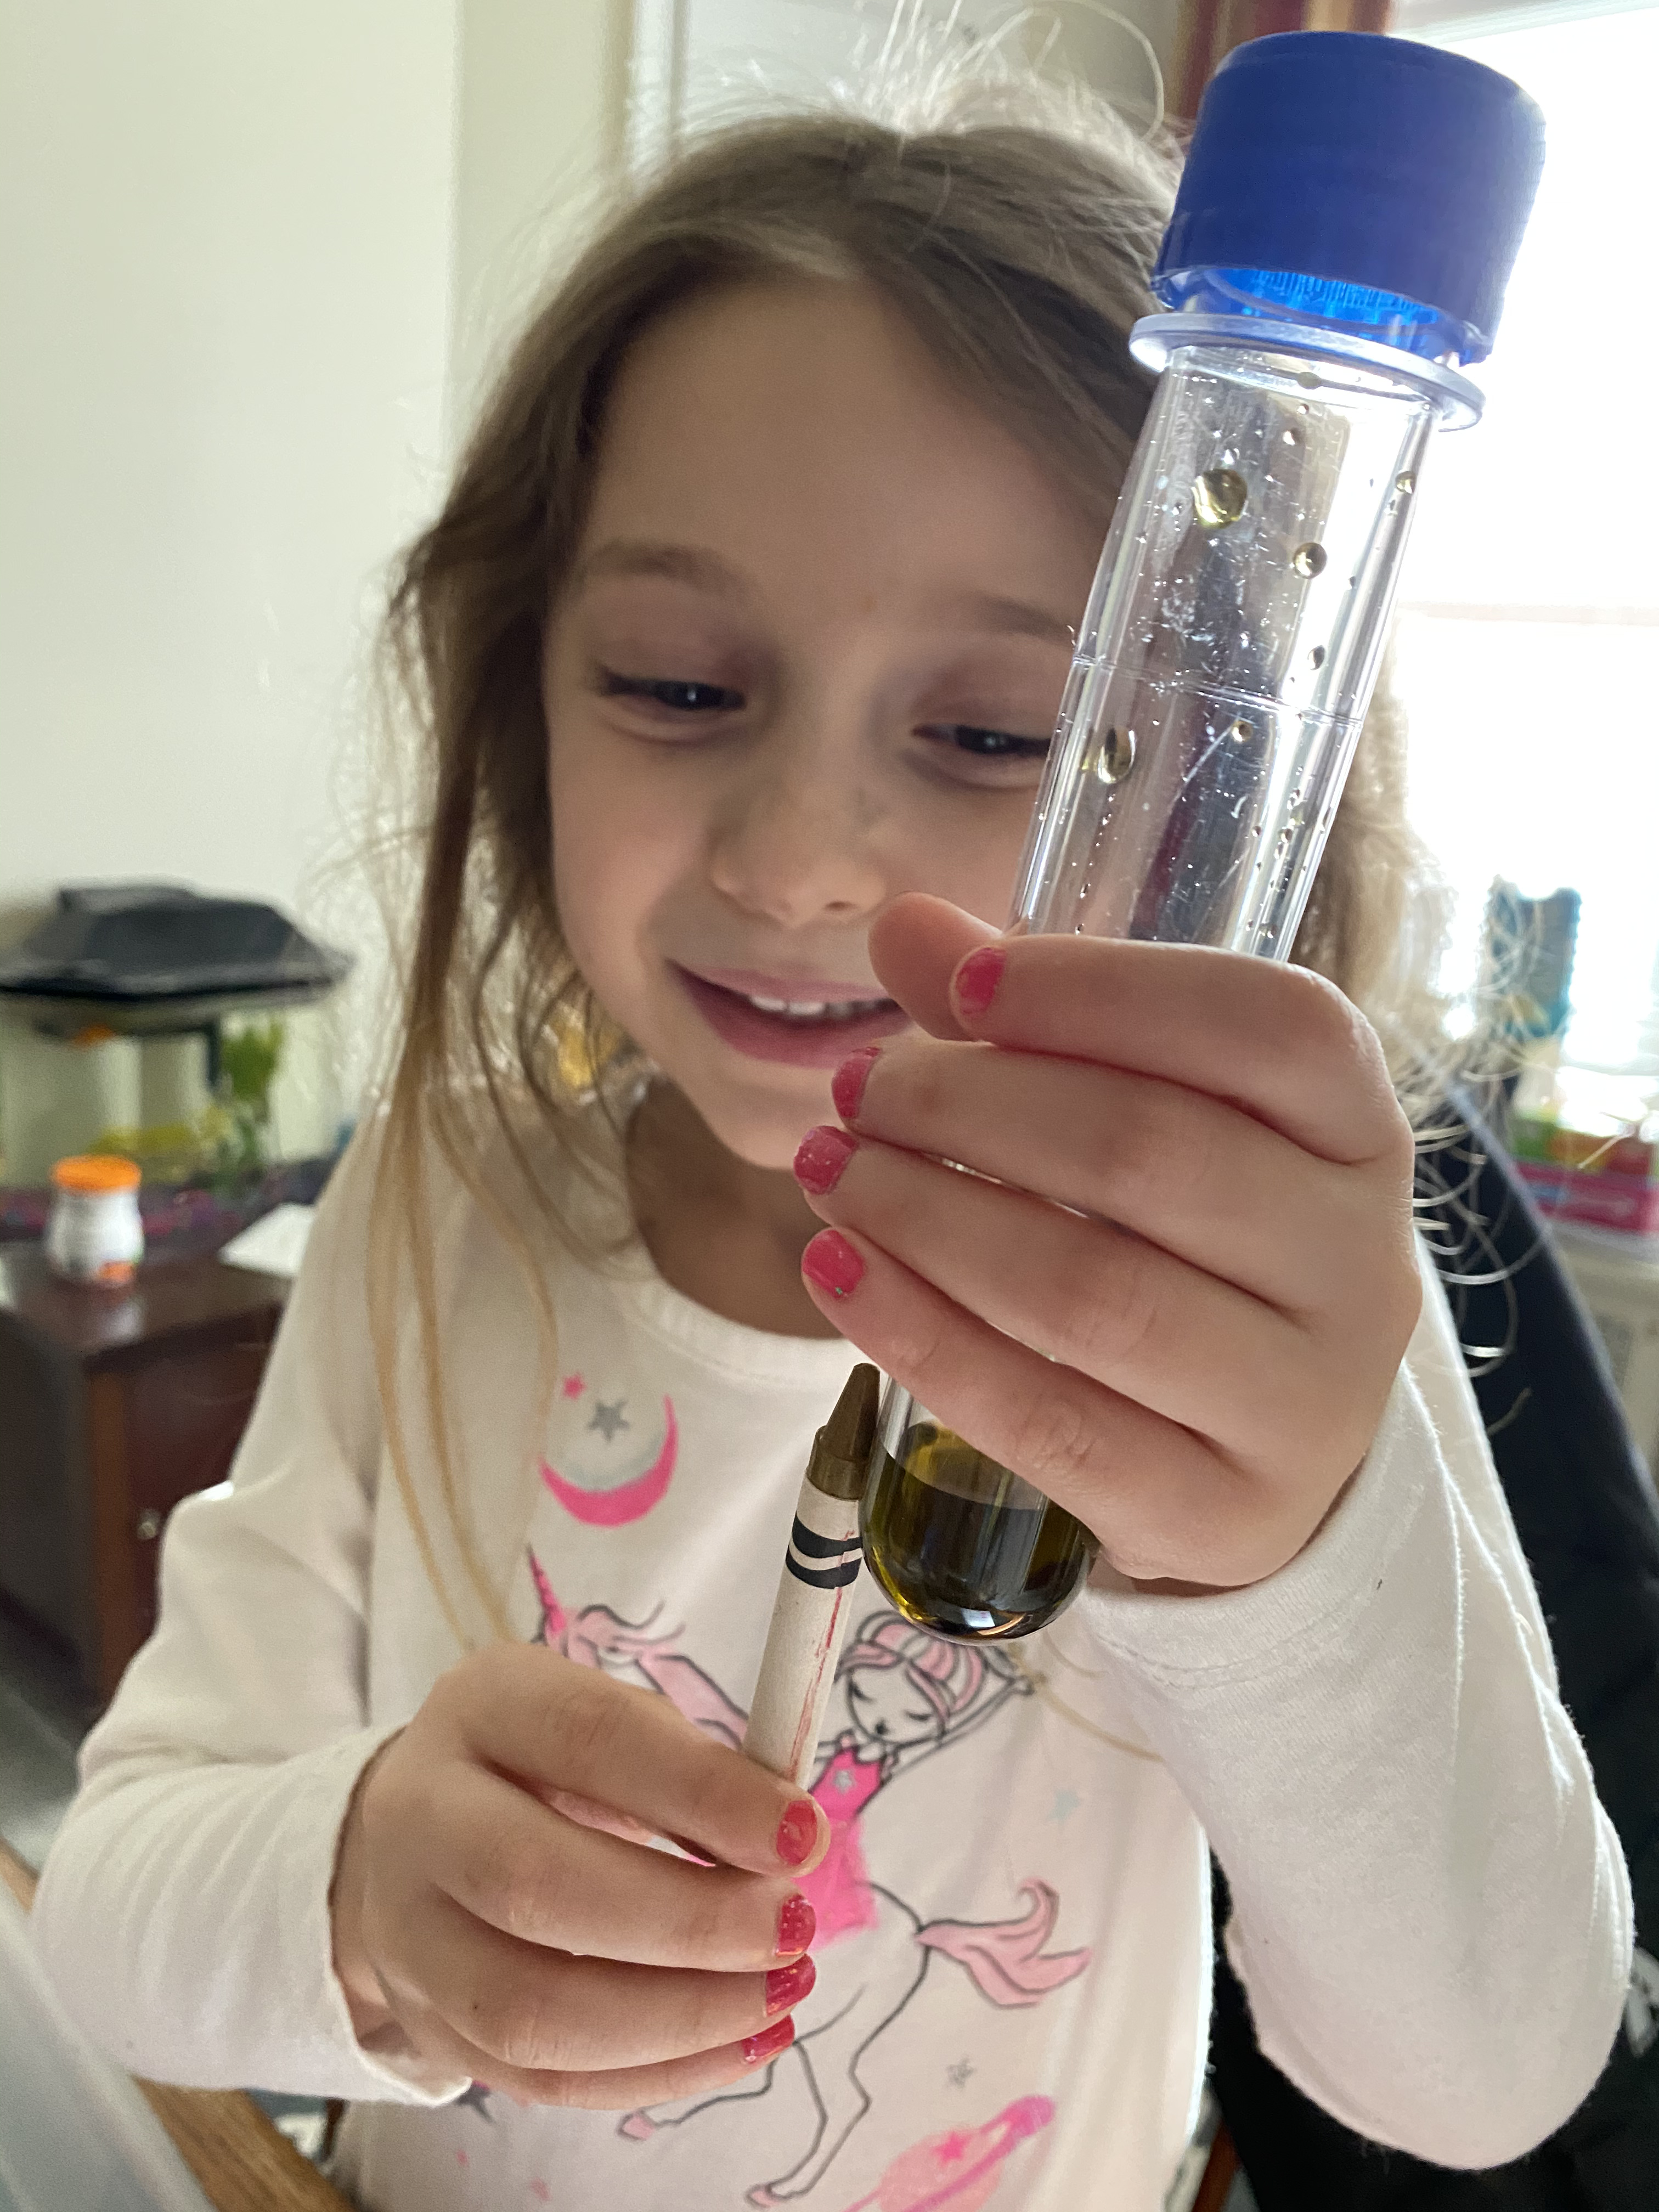
Amelia and I open up a science kit and explore colors.
To continue our science obsession, I pulled out a fun science kit I picked up at a yard sale. I was going to choose one of the projects it came with, but after Amelia really enjoyed mixing white and red to make pink with our crystal project, I figured I would continue with that theme.
The kit I have came with a collection of kid-safe test tubes, droppers and other scientific items. So I grabbed some water, food dye of the primary colors and small bowls.
I had Amelia add two drops of each color to the bowls.
Even though she knows the color combinations from school, we started our experiment by drawing a grid that she filled out as we went along. At first it was simple, so we checked out what red plus yellow made, and yellow and blue, and so on.
I drew out circles so that she could record the results, which she also enjoyed because she felt like she was performing a real scientific study.
The grid we created to record our results.
I have to say it was a lot of fun for both of us. Amelia got such a kick out of using the test tubes and droppers.
As you can see on the grid, eventually we started mixing the new colors (secondary colors) with others to see what would happen. To be honest, most of them made a greenish-brown color. We tried to match the colors up with her Crayola Crayons as close as we could.
The bottom line is Amelia got some experience using the lab tools, and she quickly (after a minor spill) learned the importance of being careful along with proper care of the equipment. Mixing the colors proved what she had been taught in school, that yellow and blue make green, and so on. She thought that was pretty cool. It’s always good to find ways to reinforce the lessons kids learn in school.
Walden University perfectly summarizes the importance of science in the classroom . “…there are individual benefits to learning science, such as developing our ability to ask questions, collect information, organize and test our ideas, solve problems, and apply what we learn. Even more, science offers a powerful platform for building confidence, developing communication skills, and making sense of the world around us—a world that is increasingly shaped by science and technology.”
I saw a lot of this in our science experiments this week, although Amelia’s favorite part was definitely using the test tubes. My favorite was at the end when she said “Daddy, I think I want to be a scientist.” How cool is that?
SOUND OFF:What are some projects you have used with your kids that involve mixing colors? Let us know in the comments. Amelia and I are always looking for new projects.
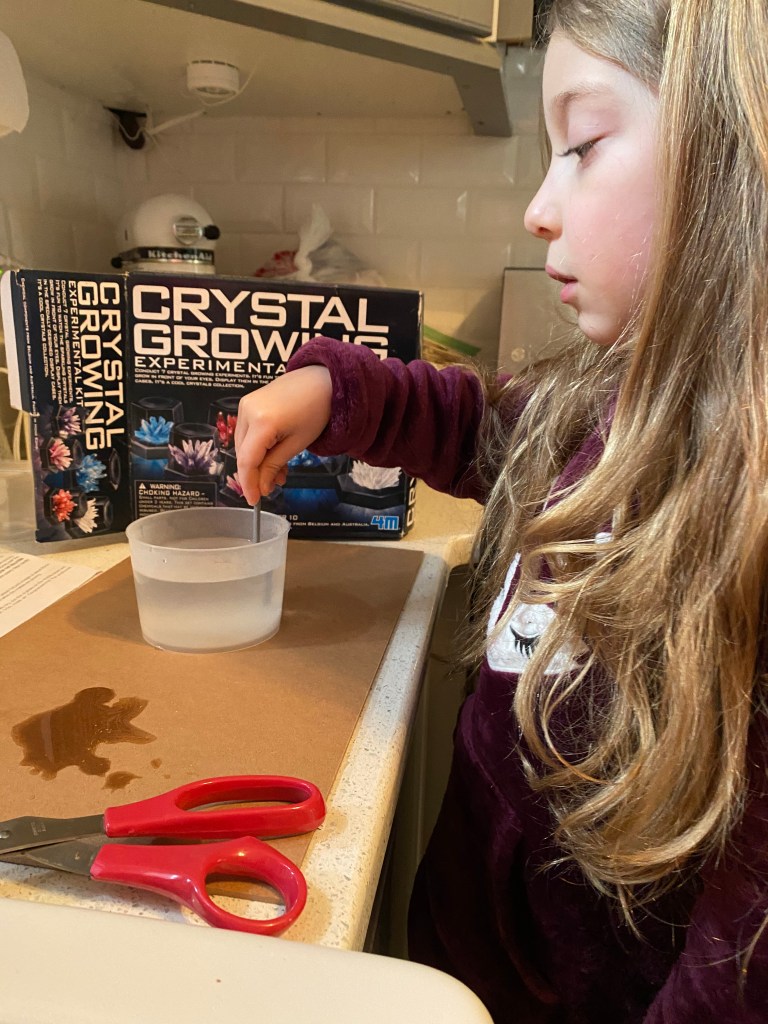
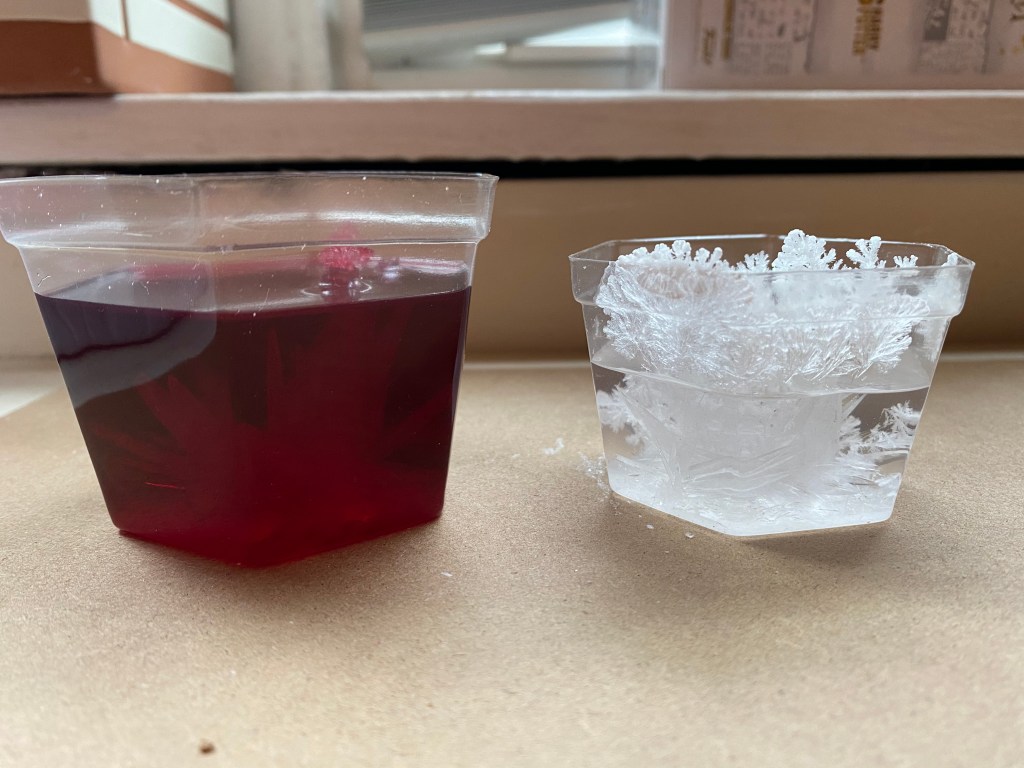
Amelia creates her own crystals for the first time and the final crystals are AWESOME.
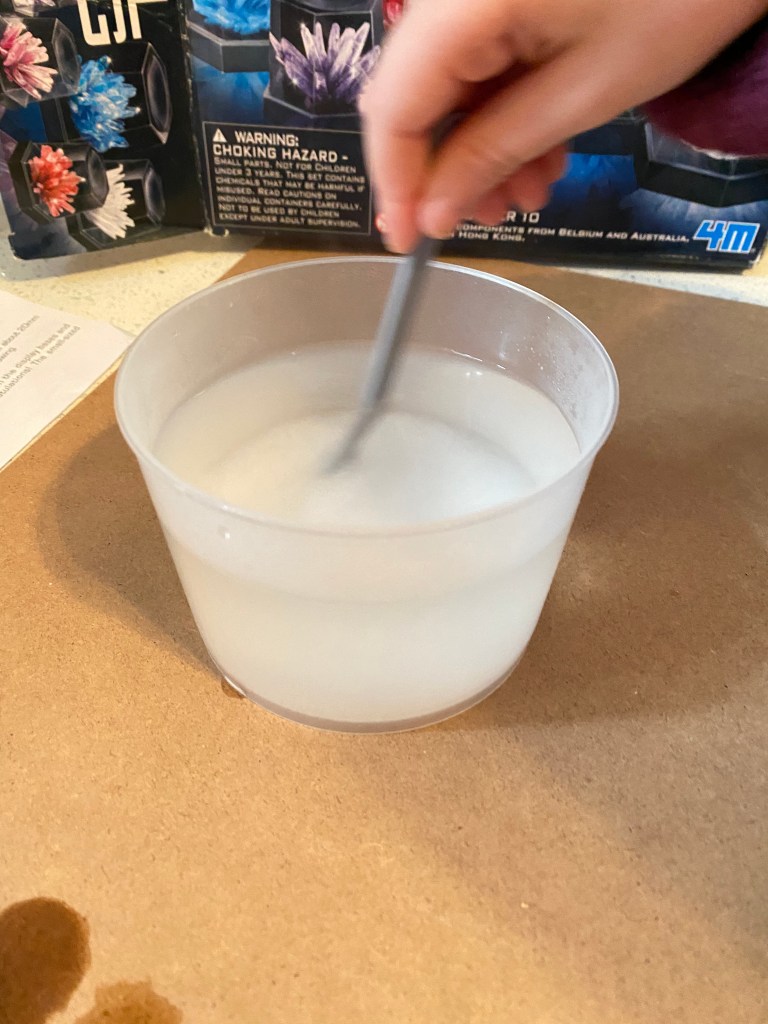
Last week, Amelia and I decided to focus on science. We started with a crystal kit. Yes, the kit is listed as 10 years old and up, but I figured we could handle it. The boiling water was probably the reason for this, so make sure you help any kiddo under ten.
It was pretty simple. We had to boil water and measure it out. Then we added chemicals to the boiled water and stirred.
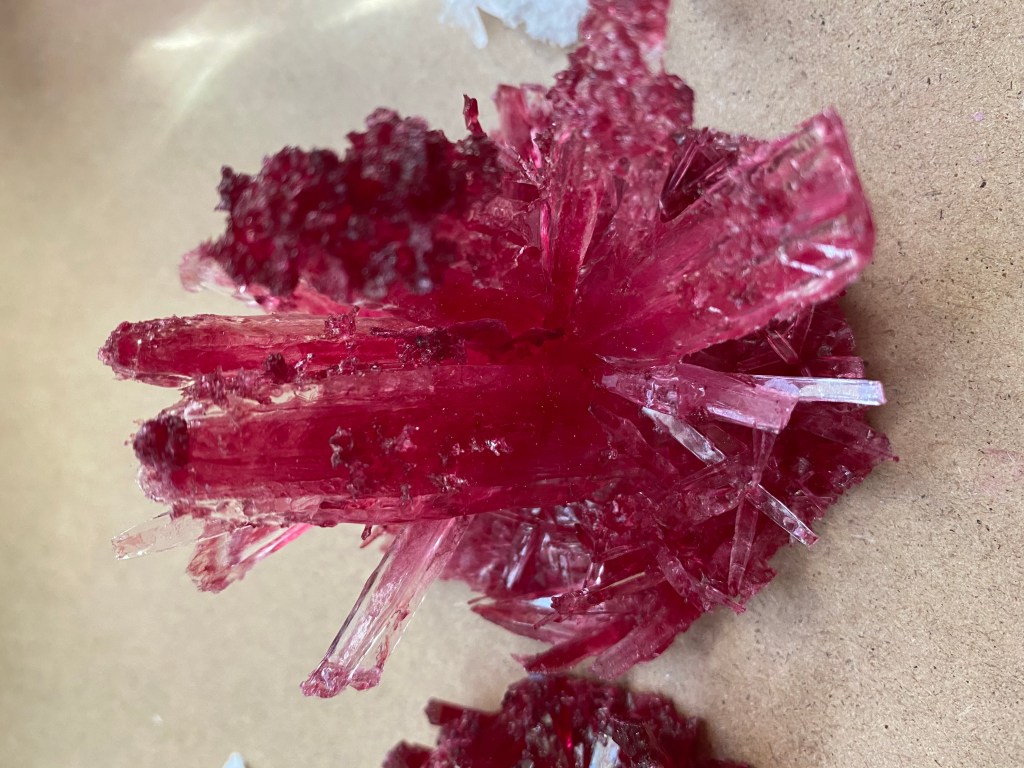
After that, we had to let it cool a bit. Then we added it to smaller cups, where the crystals would grow. The next step was to choose colors. Of course, Amelia wanted pink. So she made one pink, one white (because to make pink we had to add powder that was red and white) and I got to choose the third color. I chose red since we were already using it for the pink.
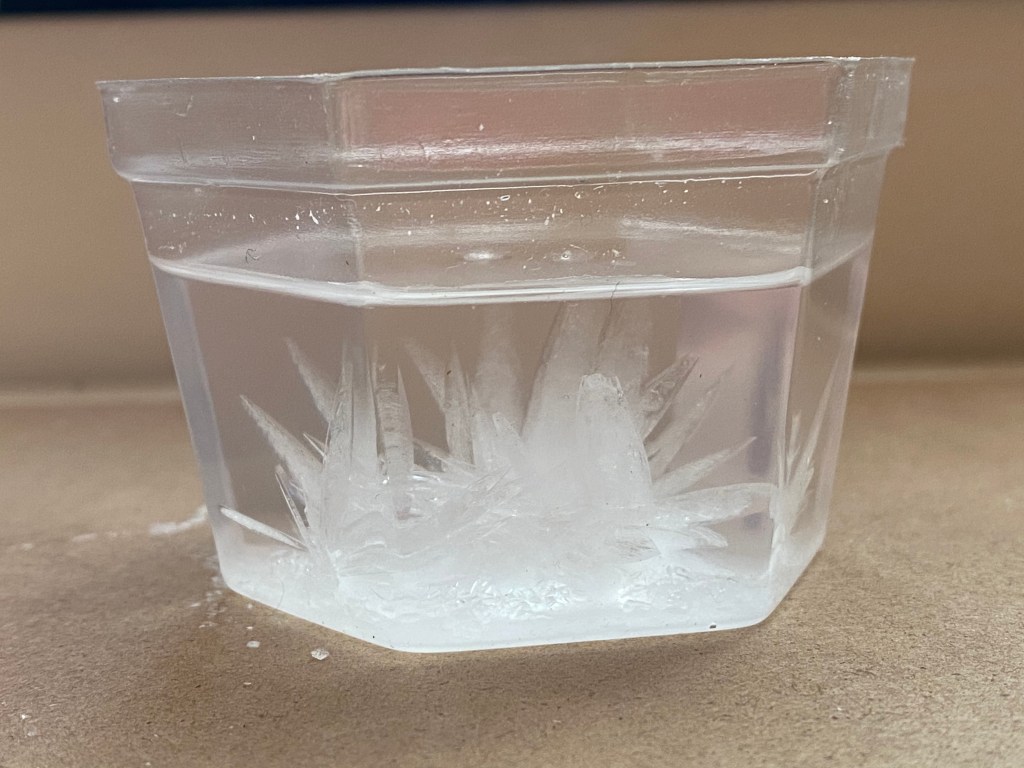
Now we just had to wait. Surprisingly, by the next morning we already had this:
And this, which is harder to see because it’s Amelia’s pink one:
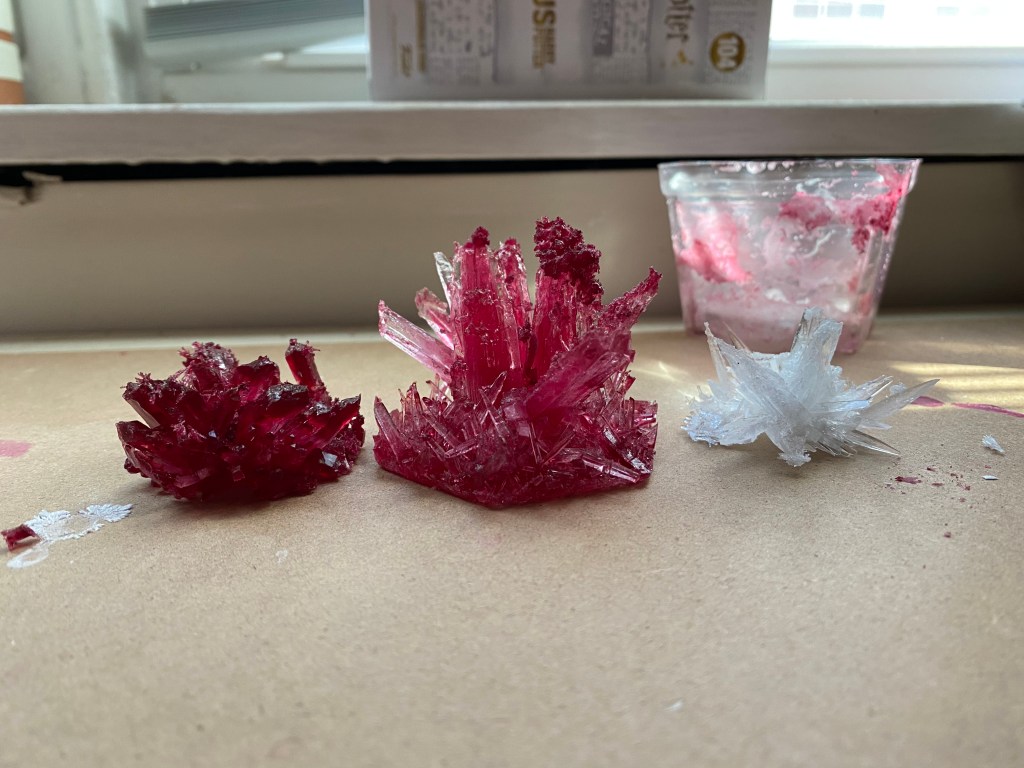
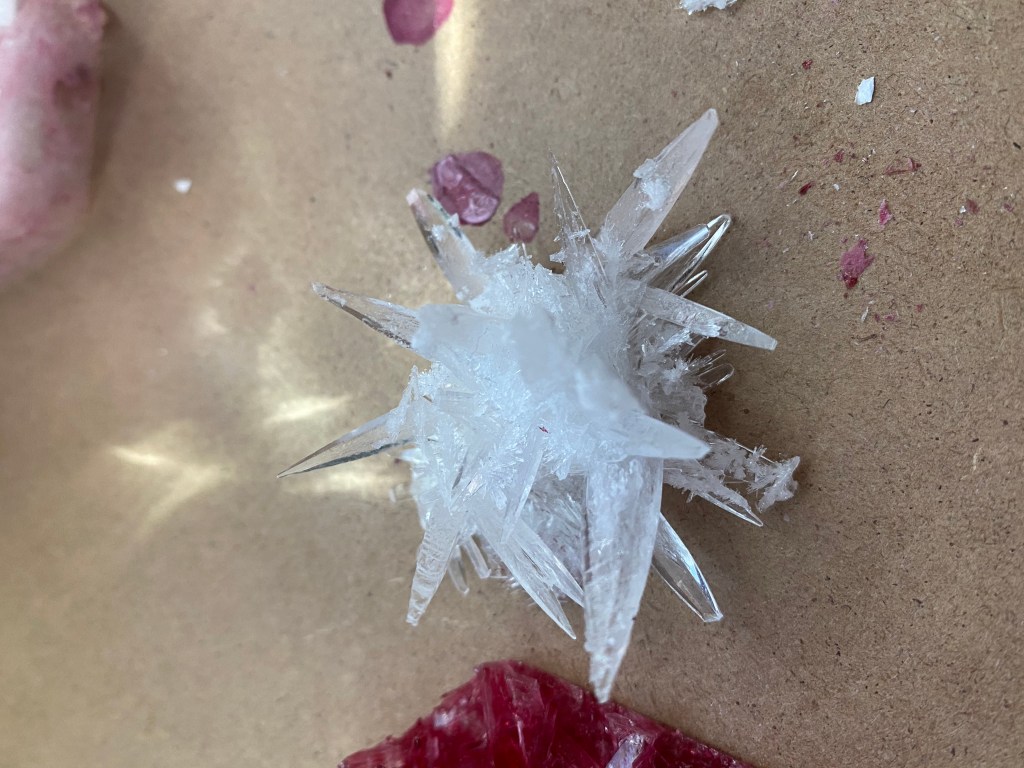
Two days later, the crystal started to grow out of the cups. After some research, this is when we should have carefully dumped the chemicals out. We didn’t, so they got a little mutated:
You can see, from the first group of photos to the second, that they started to look a little bit like coral.
Eventually, we dumped out the liquid (and my fingers became a bit stained pink for a few days). But the final product was very cool, considering it was our first time growing them.
We wanted to know how and why this happens, so we watched this video:
I also wish I saw this project first. Childhood 101 has a really cool project that is similar, but uses pipe cleaners shaped like hearts. I absolutely love this project and am hoping to do this one with Amelia. I think she will love it. Here is a photo of their final project:
What did we learn from this project? Measuring. We had to carefully measure the water and the chemicals that created the color. We could have also measured the crystals as they grew, and figured out their growth rate. We also had to exercise patience, knowing that the crystal would grow slowly. Honestly, I was surprised at how quickly the crystals grew. I thought it would be days before we saw any action, but after ten hours there was already a bit of formation.
Overall, we had a last and got some really cool crystals we made ourselves. I thought the white one turned out the coolest, personally. Amelia loved her pink one. Next time we will be creating the heart-shaped ones.
Creating a Lego maze is a great little lesson involving STEM learning and motor skills.
Do you have a bunch of Lego sitting around? How about a big green baseplate? (Baseplates are the large, flat pieces you build big sets on).
We are a Lego family, so it’s normal for us to have Lego in boxes all over the place. If you aren’t, Dollar Tree has some off-brand ones you can grab.
Lego was coming up with little lesson plans last April when things went South pandemic-wise, and one inspired us to create a maze using Lego bricks and a marble. Amelia and I both did it, and then when her cousins came over we all made one.
It’s simple: make a maze out of Lego bricks by placing them strategically on a baseplate. This pushed Amelia in many new ways, such as trial and error. She started putting the pieces too close for the marble to fit, so I had her test it. When the marble wouldn’t fit, she realized she had to make more space.
Then it’s about reaction and motor skills. Once we were done, we had to test our mazes, and see how hard they were, if the marble would fit everywhere, and if we remembered to make a path from the entrance to the exit.
Amelia LOVES mazes, so creating one was fun for her. She worked on motor skills, STEM skills, and we had a lot of fun. I highly recommend this one!
If you need help or inspiration, here is a video on how to do it:
The emerging idea of having a lunch buddy while virtual learning is a big deal, and gets the child social interaction plus some activity during their scheduled lunch break.
So here at Pod of One we are always looking for ways for Amelia to get some social time with friends, and we’ve been hearing about a new idea that I personally find intriguing.
It’s the concept of finding a lunch buddy. Since we all get a lunch break, it makes perfect sense to try to find someone in the neighborhood with whom we can coordinate a lunch play date, even if it’s just once per week. This gets the kiddos some social interaction, while it also forces us out of the house and moving around as well.
Our plan is to reach out to our class via out PTO’s website and see if anyone is in our area that can meet at one of the playgrounds for a picnic when the weather is nice. Once winter comes this will be tough, so it’s something we should get on ASAP.
Obviously, the idea would be to social distance the usual six feet, maybe more since we won’t be wearing masks, and eat while we talk about our day. It can also be a great chance to review what was learned.
We are hoping to find someone in her class who has the same lunch hour and who has a parent or guardian working from home who also gets a lunch break, and try to coordinate a meet-up.
I’m always looking for other ways you are all getting some social time, so please, comment below with any new ideas you may have. Thanks for stopping by!
Amelia and I both love drawing. It’s creative, fun, and we get to work together on the lesson. I started college out as an art major, so I never mind a fun drawing project.
One of our favorites is to watch a step-by-step video on how to draw something. We grab a box of markers and crayons, some books to lean on, and paper. We sit on the couch, bring up our favorite YouTube art instructor, and scan through the choices of lessons.
Sometimes what we draw is inspired by something else we are learning about that day, like ants. Other days I just ask Amelia what she would like to draw.
We have one YouTube drawing teacher that is our go to, Art for Kids Hub. The guy’s name is Rob, and he’s fantastic. He always has a kid drawing with him and teaches how to draw animals, toys and other things step-by-step.
He also makes sure to aim his lessons at varying ages. Some of the easier ones, like ice cream, are perfect for a kindergartner. He has others, like LOL dolls, for kids who are a bit older.
This is an excellent example of one for a younger child:
And there are others for older, more advanced artists:
He’s got it all. Whatever you are looking to learn to draw, he has probably done it. It’s always fun for us to draw our pictures in black marker and then color it in.
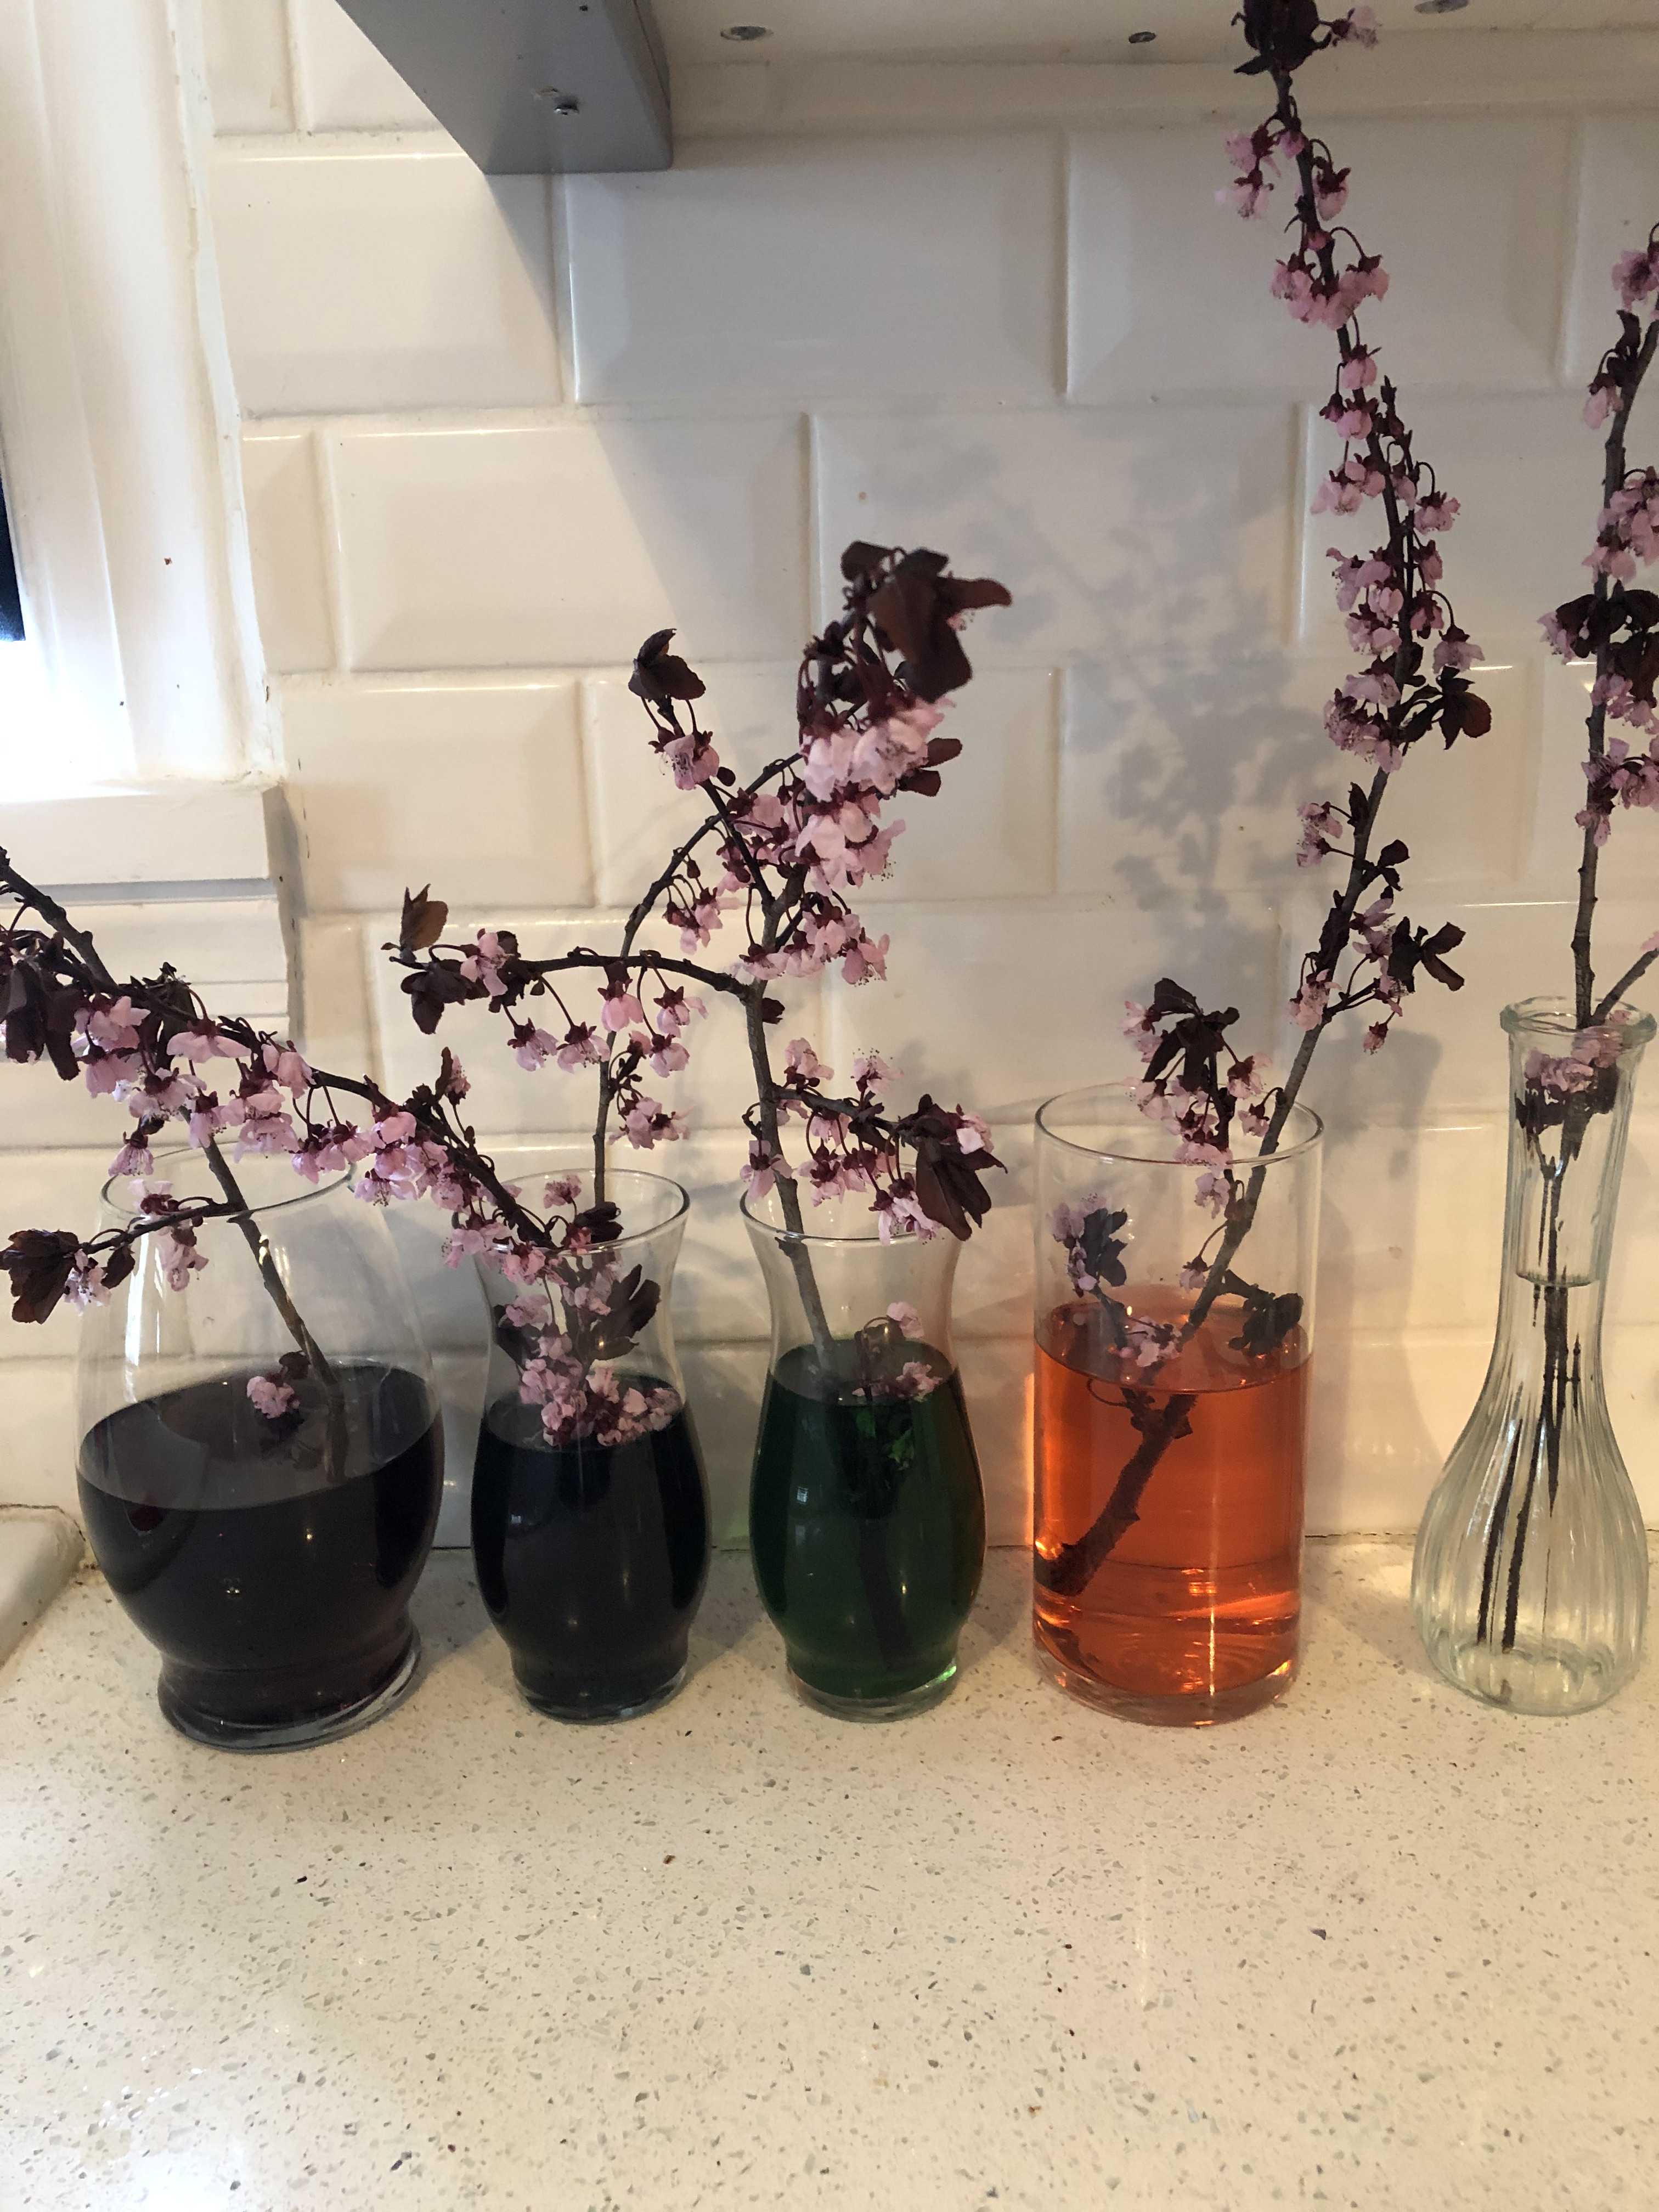
We had a really cool project that just requires white flowers and food coloring.
On one of our many walks, Amelia and I collected flowers from a tree at the playground. Ours had the tiniest of pink pigment, so they weren’t perfect, but give me a break. We were in the middle of a full quarantine!
Then, we added food coloring and watched the flowers slowly change colors.
This was a GREAT project we had seen a friend do and decided to mimic. First we learned a bit about plants. Scholastic helped us out with that again. We reread From Seed to Plant and learned all about how plants grow and how they drink water.
Then I asked her, if a flower drinks blue water, will it turn blue?
She scrunched her nose in thought, and eventually decided that no, it would not.
I asked if we would turn blue if we drank blue water. She answered with a confident “no!” and I wondered why.
“Because mommy drinks that brown drink [coffee] every morning and hasn’t started changing color…”
Touché, Amelia.
So we added different colors, all of her choice, to water and put a flower or two in each one.
After a little while, they did start to change color. She was really surprised, and I was just glad the project worked.
If you want to do the project, it’s pretty much as easy as putting white flowers into water with food coloring, and then exercising patience. But they MUST be white. Ours had the tiniest bit of pink, which made it less obvious.
Here is a video that will help:
This is a really fun activity that everyone can enjoy. For older kids, you can discuss why and how it happens. For younger ones, it’s about how plants grow and the fun of seeing them change color.
And if you want to explain how it happens, Go Science Girls has a great explanation.
Either way, it’s a great project that is simple and takes items you probably have around the house (or neighborhood) anyway.
Anyone a fan of Mary Poppins? Okay, we aren’t exactly jumping into magical worlds through our chalk art on our sidewalk, but it’s been fun.
It started as a positivity thing. Everyone was tired of being stuck, and we saw the movement on social media of decorating sidewalks with kind messages to cheer everyone up. After all, our only escape from the home were our daily walks, and we took them daily, sometimes twice in a day.
We wrote nice messages, drew flowers, made happy faces, rainbows, whatever we felt like drawing. Amelia would tell me the nice messages she wanted me to write, and I would spell them out. Then she colored it in.
Now, even though less people are walking our neighborhood, we are still doing chalk art on the sidewalk a few times a week. It’s a fun art project, we listen to music and Amelia always greets everyone who walks by.
It’s especially cool to see how social she has become during all of this. She says hello to most people who walk by. This is a great opportunity for her to get a little bit of social time because our street seems to attract a decent number of pedestrians. Since March she has really only seen family.
We also discuss color names, what mixing two colors does, and other things. We’re also getting some great outdoor time in fresh air.
Mommy University says there are three major benefits of playing with sidewalk chalk: enhanced academic knowledge, improved fine motor skills and a greater appreciation for the arts.
If you are on a tight budget, the dollar store usually has a decent variety of sidewalk chalk.
And the beauty? There’s no clean-up…just let the next storm wash away the images. Then you can draw again on a fresh canvas. Sometimes even mommy joins us!